
There’s something incredibly comforting about this Creamed Corn Recipe—it’s creamy, slightly sweet, and just the right amount of savory. This little side has become my go-to when I want something quick that tastes like it took hours. You’re going to love how simple it is to make yet feels so special on the table.

Jump to:
Why You'll Love This Recipe
This recipe is a total crowd-pleaser, and I love how easily it fits into any meal. Whether you’re serving it for a weeknight dinner or a holiday feast, it’s creamy, comforting, and downright addictive.
- Simple Ingredients: You probably already have everything in your kitchen, making it super easy to whip up.
- Customizable Texture: You can leave it chunky or blend some corn for that luxe creamy finish.
- Great for Any Diet: Easy to make dairy-free or vegan with just a couple ingredient swaps.
- Ready in 20 Minutes: Perfect when dinner needs to come together quickly but still impress.
Ingredients & Why They Work
Each element in this creamed corn recipe plays a part in creating that classic creamy texture and rich flavor without fuss. Here’s why I choose these ingredients—and some buying tips to keep it simple and fresh.
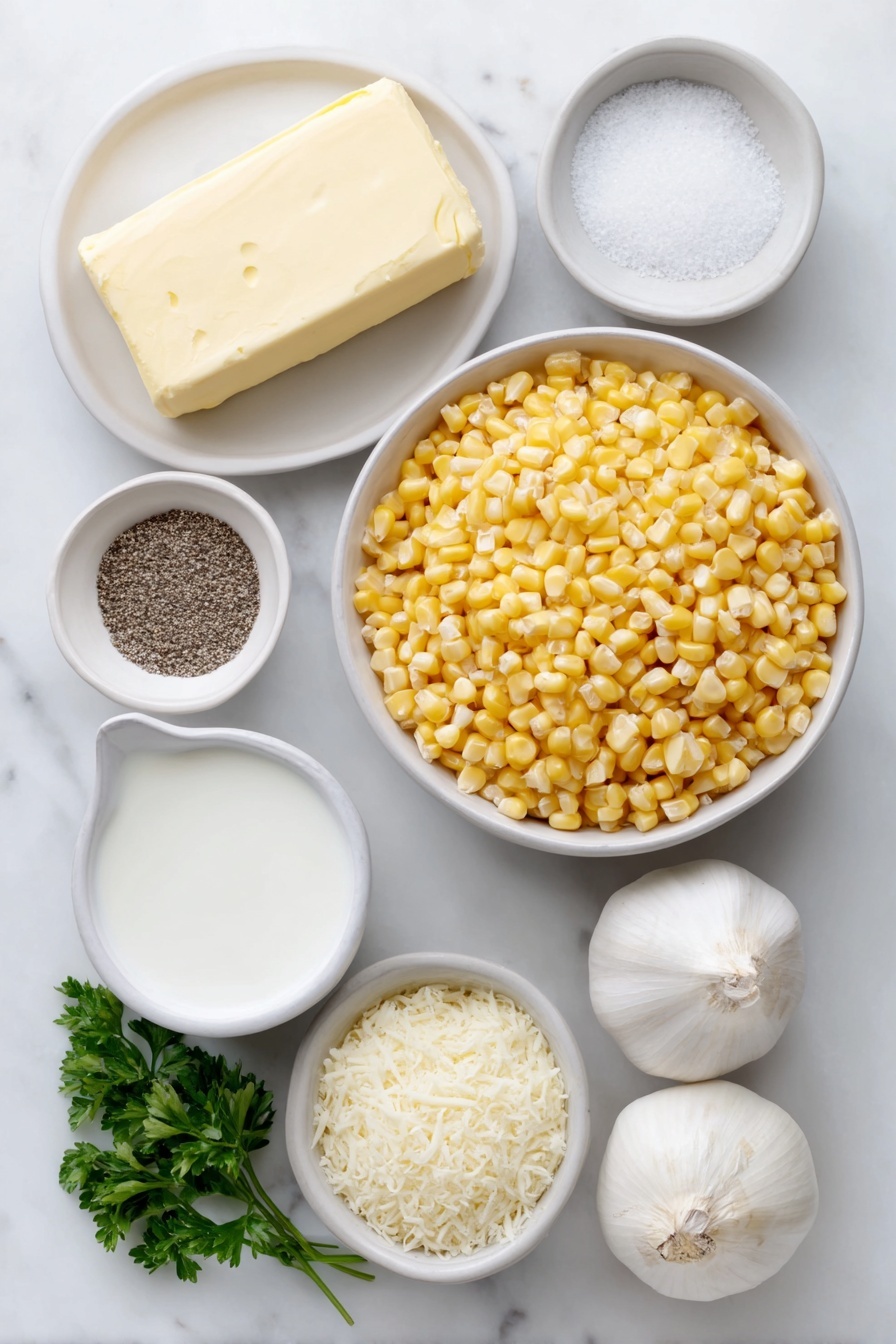
- Unsalted butter: Gives a silky richness and lets you control the salt level throughout the dish.
- Yellow onion: Adds a lovely subtle sweetness and depth once sautéed slowly.
- Garlic: Just a touch brings warmth and complexity without overpowering the corn’s natural flavor.
- Frozen corn kernels: Convenient, consistent, and actually taste great—make sure to thaw before cooking.
- Salt and freshly ground black pepper: The ultimate seasoning combo to enhance all the natural flavors.
- Whole milk or dairy-free milk: Creaminess base—whole milk gives a lovely richness, but you can swap with almond or oat milk for a vegan twist.
- Arrowroot powder, cornstarch, or all-purpose flour: Used to thicken the sauce, pick whichever you have on hand.
- Freshly grated parmesan (optional): Adds a punch of savory, cheesy flavor if you’re feeling indulgent.
- Fresh parsley: For a pop of color and fresh herbal brightness at the end.
Make It Your Way
I love this creamed corn as is, but once you get comfortable with the basics, there are plenty of ways to make it your own. Feel free to tweak texture and flavors until it feels just right for you.
- Variation: If you want a smoky twist, add a bit of smoked paprika or bacon bits—trust me, it’s heavenly.
- Make it Vegan: Swap butter for vegan margarine and use almond or oat milk for a dairy-free creamy goodness.
- Spicy Kick: A pinch of cayenne pepper or a drizzle of hot sauce brightens things up beautifully.
- Extra Creamy: Stir in a splash of heavy cream or coconut cream at the end for ultimate indulgence.
Step-by-Step: How I Make Creamed Corn Recipe
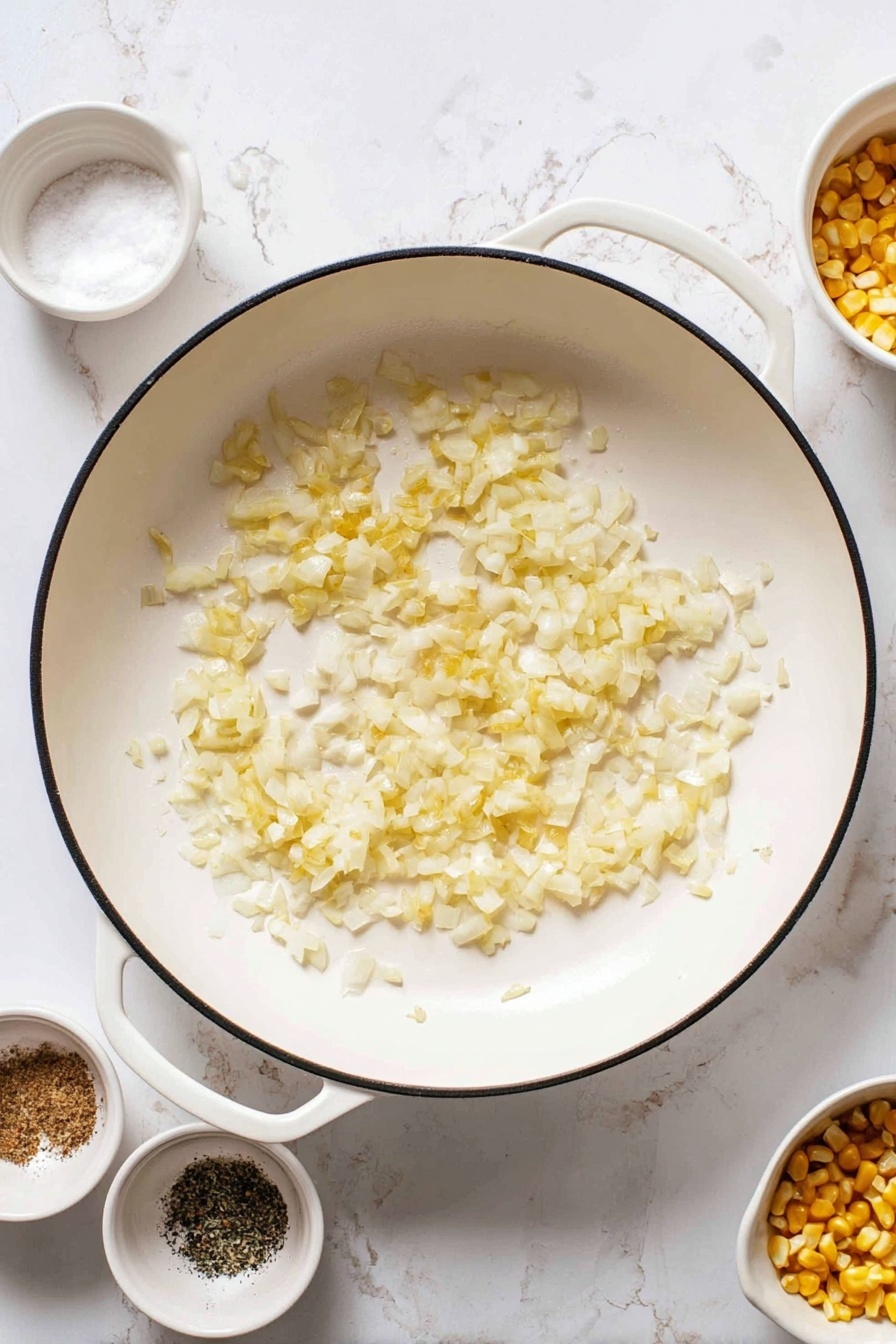
Step 1: Sauté Onion and Garlic for Flavor
Start by heating a tablespoon of butter over medium heat until it melts and gets a little bubbly. Toss in the chopped onion and minced garlic, and let them cook gently for about 5-6 minutes. You'll know they're ready when the onions are soft and your kitchen smells amazing. Stir occasionally so nothing browns too fast—slow and steady wins here.
Step 2: Cook the Corn with Seasoning
Next, add the thawed corn kernels along with salt and freshly ground black pepper. Cook everything together for about 5 minutes until the corn softens a bit and absorbs those lovely flavors. This step builds the base, so resist rushing.
Step 3: Whisk Milk and Thickener
While the corn cooks, whisk together your milk and arrowroot powder (or whichever thickener you're using) in a small bowl until smooth. This mix is what gives the creamed corn that luscious, thick texture we all crave.
Step 4: Combine and Simmer to Thicken
Pour the milk mixture into the skillet with the corn and turn up the heat just enough to bring it to a gentle boil. Then immediately reduce the heat and let it simmer for 3-5 minutes until it thickens nicely. Keep an eye on it and stir occasionally so nothing sticks or burns on the bottom.
Step 5: Blend Some Corn for Creaminess (Optional)
This is where you can make it super creamy if you want. I usually take about a cup of the corn mixture and give it a quick zap with an immersion blender—just enough to break it down and thicken the sauce without losing all the texture. If you don’t have one, you can transfer the corn to a regular blender, puree, then stir it back in. It’s a fun trick that never fails to impress!
Step 6: Final Taste and Serve
Give your creamed corn a taste and adjust the seasoning. Sometimes I like to stir in freshly grated parmesan here for a little cheesy magic, but it’s totally up to you. Serve it warm with a sprinkle of fresh parsley for that fresh pop of color and flavor.
Top Tip
From my kitchen to yours, here are the little nuggets I’ve learned that make this creamed corn recipe foolproof every time.
- Thaw Corn Fully: Make sure the frozen corn is completely thawed to help it cook evenly and release maximum sweetness.
- Patience with Sautéing: Don’t rush the onions and garlic; their mellow flavor is the backbone of this dish.
- Adjust Thickness: If your sauce gets too thick, stir in a splash more milk to loosen it back up—better than over-thickening it.
- Blend Carefully: When pureeing, pulse gently—you want creaminess but also some bite from corn kernels.
How to Serve Creamed Corn Recipe

Garnishes
I love topping creamed corn with fresh parsley—it brightens the whole dish and adds nice color. Sometimes, I sprinkle a little smoked paprika or freshly cracked black pepper on top for that extra pop. If I want to get fancy, a few crispy fried shallots or bits of crumbled bacon add a delightful crunch.
Side Dishes
This creamed corn pairs beautifully with roasted chicken, grilled steaks, or even a vegetarian plate of sautéed greens and mashed potatoes. It’s also a fantastic side for a classic Southern meal—think fried chicken and biscuits. I’ve had it alongside BBQ ribs too, and oh boy, it’s a match made in heaven.
Creative Ways to Present
For special occasions, I like to serve creamed corn in small ramekins topped with a sprinkle of parmesan and a sprig of parsley. You can even spoon it into baked mini bell peppers or hollowed-out zucchini boats for a cute, seasonal presentation. It’s an easy showstopper!
Make Ahead and Storage
Storing Leftovers
I store leftover creamed corn in airtight containers in the fridge, and it stays tasty for about 3-4 days. When I reheat, I gently warm it on the stovetop over low heat, stirring occasionally. If it feels a little too thick after chilling, I add a splash of milk to get that creamy, just-made texture back.
Freezing
I haven’t personally frozen this creamed corn often because I usually eat it quickly, but if you want to freeze it, do so before blending for best texture after thawing. Freeze in portions, then thaw overnight in the fridge before reheating gently.
Reheating
When reheating, stovetop is gentler than microwave—heat slowly over low and stir well. If needed, add a little milk to loosen up the sauce. This keeps it ultra creamy rather than dried out or curdled.
Frequently Asked Questions:
Absolutely! Fresh corn is fantastic when it’s in season. Just cut the kernels from the cob and cook as directed, maybe adjust the cooking time slightly since fresh corn might soften faster.
Simply swap the butter for a vegan butter or oil, and use your favorite dairy-free milk such as almond, oat, or coconut milk. The arrowroot or cornstarch will still thicken the sauce nicely without dairy.
Yes, you can prepare the creamed corn a day in advance. Store it covered in the refrigerator and reheat gently on the stovetop with a splash of milk to refresh the creamy texture.
You can use arrowroot powder, cornstarch, or all-purpose flour as a thickener, mixed with milk before adding to the pan. I prefer arrowroot for a glossy finish, but any will work fine depending on your pantry.
Final Thoughts
This Creamed Corn Recipe holds a special place in my heart because it’s one of those dishes that feels so comforting and yet so simple. Sharing it with friends or family always brings smiles, and honestly, it’s a little kitchen secret for when you want to feel like a pro with minimal effort. Give it a try—you might just find yourself making it over and over like I do!
Print
Creamed Corn Recipe
- Prep Time: 5 minutes
- Cook Time: 15 minutes
- Total Time: 20 minutes
- Yield: 6 servings
- Category: Side Dish
- Method: Stovetop
- Cuisine: American
- Diet: Vegetarian
Description
A simple, creamy, and comforting creamed corn recipe made with butter, onions, garlic, and corn, thickened with milk and arrowroot or cornstarch. Perfect as a side dish and easily adaptable to dairy-free diets.
Ingredients
Main Ingredients
- 1 Tablespoon unsalted butter
- 1 small yellow onion, chopped
- 2 cloves garlic, minced
- 1 16 oz bag frozen corn kernels, thawed
- ½ teaspoon salt, plus more to taste
- ¼ teaspoon freshly ground black pepper
- 1 ½ cups whole milk or dairy-free milk
- 1 Tablespoon arrowroot powder, cornstarch or all-purpose flour
- ¼ cup freshly grated parmesan, optional
- Fresh parsley, for serving
Instructions
- Heat butter and sauté aromatics: Heat butter in a medium skillet over medium heat. Add chopped onion and minced garlic, sautéing until fragrant and translucent, about 5-6 minutes.
- Cook the corn: Add thawed corn kernels, ½ teaspoon salt, and ¼ teaspoon black pepper to the skillet. Cook the mixture until corn softens, about 5 minutes.
- Prepare thickening mixture: In a small bowl, whisk together the milk and arrowroot powder or cornstarch until smooth.
- Combine and thicken sauce: Pour the milk mixture into the skillet with the corn. Bring to a boil, then reduce heat and simmer until the sauce thickens, about 3-5 minutes.
- Optional blending for creaminess: For thicker, creamier texture, puree some of the corn mixture using an immersion blender or transfer about 1 cup to a blender or food processor. Blend and stir back into the skillet.
- Season and serve: Taste and adjust salt and pepper if needed. Stir in freshly grated parmesan if desired for extra cheesiness. Garnish with fresh parsley and serve warm.
Notes
- Make it dairy-free: Use dairy-free milk and vegan butter to accommodate a dairy-free diet.
- Storage: Store leftovers in an airtight container in the refrigerator for 3-4 days. Reheat gently on stovetop over low heat or in microwave, adding a splash of milk to restore creaminess if needed.
Nutrition
- Serving Size: 1 cup
- Calories: 160 kcal
- Sugar: 7 g
- Sodium: 300 mg
- Fat: 7 g
- Saturated Fat: 4 g
- Unsaturated Fat: 3 g
- Trans Fat: 0 g
- Carbohydrates: 20 g
- Fiber: 2 g
- Protein: 4 g
- Cholesterol: 15 mg


Leave a Reply